Please enable javascript, or click here to visit my ecommerce web site powered by Shopify. Cobbled Together by Brenna: Melbourne -->

Pages

Showing posts with label Melbourne. Show all posts

Monday, 24 March 2014

How to photograph your work using your phone & the Lightcase


Things have been busy here, my partner (tile designer extraordinaire Dominic Crinson) and I have been developing something for designer-makers that is going to make photographing small things super easy. It's called the Lightcase and we think it is brilliant! We've been working our precious prototype taking it to makers' studios and it's working a treat. It's basically a pop up photo studio, it's portable and low tech but creates a beautifully well lit space for photographing smaller things. It folds down into a nifty A4 folder and comes with three photographic backdrops - frosted, white and black...
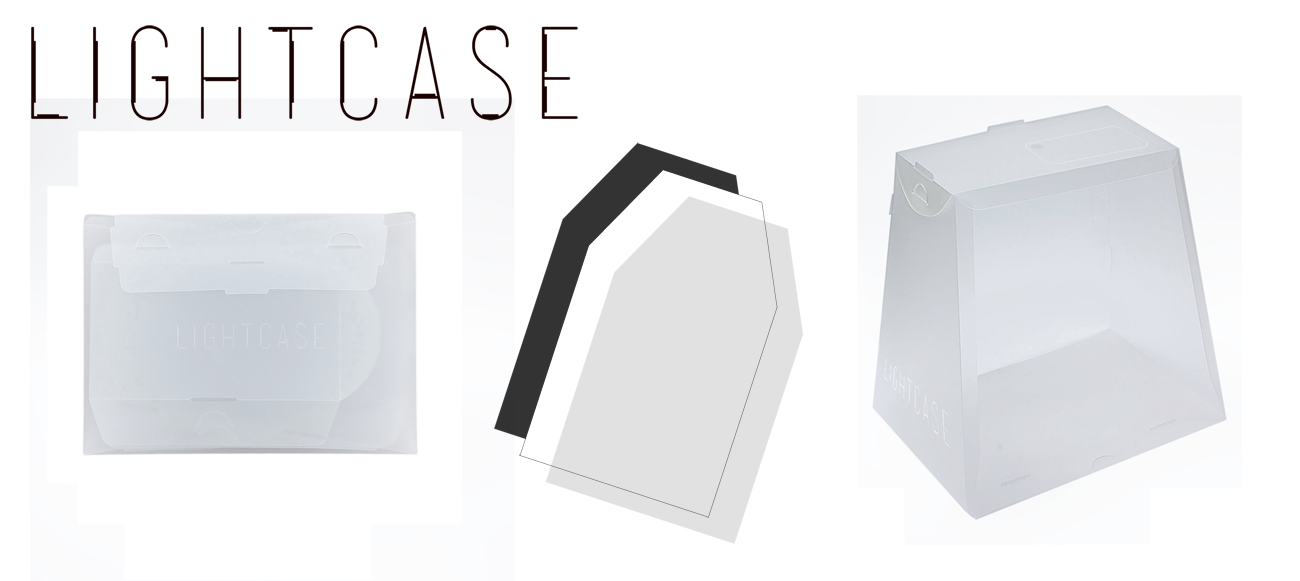


The Lightcase basically came out of a need we both had to take great photos of the things we make for selling and marketing online. We do have a really good Digital SLR but for photographing the little things, getting all that equipment out and setting up a makeshift white backdrop and good lighting all just seemed overkill. We wanted to find a simpler way and so the Lightcase was born! It's made from Polypropylene and it works so well and it's so durable. I just love the way it pops up into a mini photo studio so you can take it to where ever you have the best light available and quickly document your product from a few different angles and upload to Etsy, Folksy, Made-it or whatever e-marketplace you might be using to sell or promote your work.

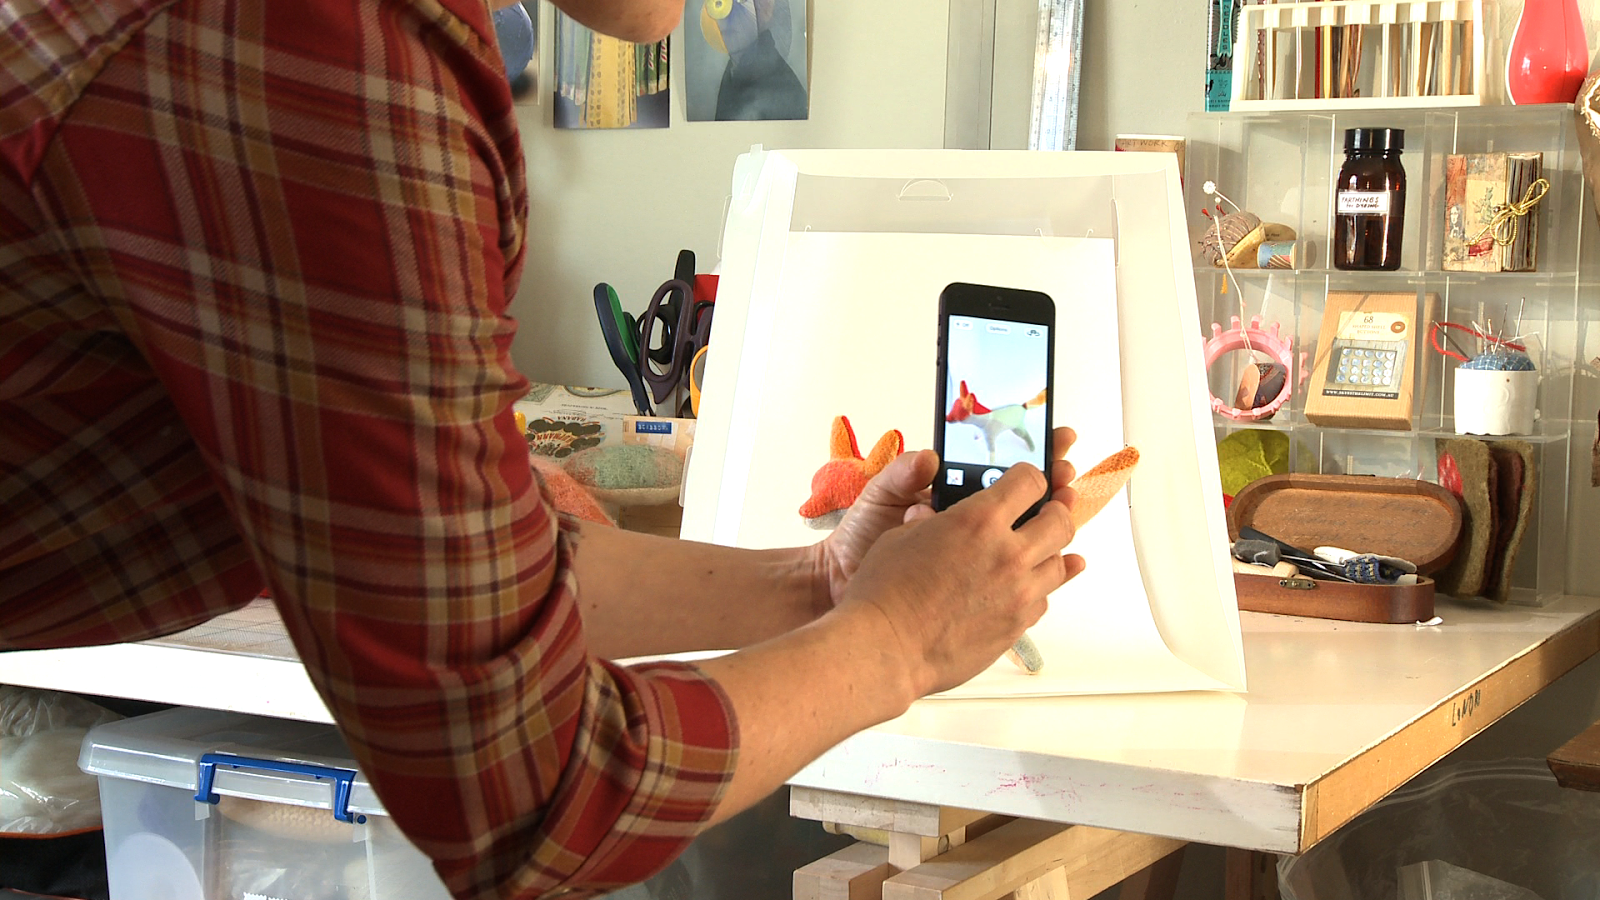
Here I'm photographing my products from the front with the white backdrop that comes with the Lightcase.


You can also photograph objects from above by placing your phone on top and aligning the lens with the hole in the top of the Lightcase. That way the Lightcase acts as a sort of tripod and you can get really sharp pics of smaller things from above. For taking pics from above you'd place the backdrop in flat as shown below...


What is great is that you don't even need a huge amount of light, the white material kind of captures the available light and traps it there and your phone camera does the rest! Smartphone cameras are pretty amazing these days and this suits me as I'd rather not get too technical, I just want to get good pics and get back to doing what I love best and that's making.

We really believe this is going to be a great tool for other crafters & designer-makers out there. We've even had a few other unexpected Lightcase enthusiasts like Warhammer miniature model makers and teachers who need to document student coursework. There are so many people who could use the Lightcase.

We're going to launch the concept on Kickstarter on the 1st April 2014 and if we can get it funded we can get the tooling done for the first production run of the Lightcase and get it out there for you all. It's going to be really affordable at about 22 pounds or around 35 US/AUS dollars... So stay tuned and if you like the idea go onto Lightcase on facebook and please do share it with anyone you know who could use one too. If you have any feedback at this stage, we'd love to hear your thoughts so leave a comment below.

Kickstarter Campaign Launch Monday 31st March 2014
https://www.kickstarter.com/projects/640799395/660666627?token=35353fb9

Like the Lightcase on Facebook to keep up with the campaign

Also www.lightcase.co.uk


Monday, 6 January 2014

Christmas orders

Happy New Year! Just a little eye candy for my first post for 2014, here are some of the guys I made up for Christmas orders, hopefully they made their way into the stockings of a few good children...


Monday, 2 December 2013

Foxy Samples

Just a quick post...working on some new patterns, here is my new fox design. This guy stands proud and he's on the run just like the foxes I've always spotted.

These are the first versions. I'm quite happy with him and his foxiness. Hopefully I'll be able to get some of these guys on Etsy soon although my haul of gorgeous wool blanket scraps is coming to an end...


I've also been making samples for a beautiful organic baby shop that I met with last week. These are two first versions of the polar bear and elephant using their gorgeous organic cotton and cashmere/wool blend fabrics... Filled with wool and embroidered with silk thread that I have dyed with rusty iron...


Wednesday, 6 November 2013

Woven blankets and blanket stitches

A friend collects old woven woollen blankets and makes hot water bottle covers from them. I was lucky enough to receive a bag of the scraps. I'm often too precious with bigger pieces of textiles that I collect and find it difficult to settle on a worthy project for them. So I love finding little scraps because you can be sure whatever you do with them it's going to be more worthwhile than sending them to the tip!


The blanket scraps were just big enough to make into a skulk of foxes. There is something very foxy about plaid, maybe it's the story book illustrations of foxes dressed in tweed. Anyway I think these guys look pretty dashing...


The blanket stitched edging around these blankets is just too special to discard and thankfully my friend had not been able to bring herself to throw them away.  Rolling the edging into little scrolls makes gorgeous coloured rounds that I have been stitching together into interesting brooches. 


Christmas is just around the corner now and I have my work cut out if I'm to complete all the projects I've started in time. For a maker Christmas always brings with it a sense of urgency and pressure as if the world stops buying handmade for another year. But like this little scroll below the world still goes around and around, as does the desire to continue to make and mend.


Saturday, 16 February 2013

Wet Felting a Bent Wood Chair

I'm working on a little experiment at the moment, covering found furniture with wool. On top of a smooth wet felted surface I then plan to add texture with knitting, needlefelt and other needlework techniques. To begin with I have removed the wooden seat round and entirely wrapped the chair with wool rug selvedge yarn. The seat is surprisingly comfortable and stable with just a figure of eight wrapping around the seat circumference.

The chair looks surprising good as it is but I would like to create a very durable and smooth felted surface that I can then embellish with other textures. The seat pad I plan to work separately with wet and dry felting and then attach to the seat and felt it in. 

So far I've started by wrapping the covered chair in fibre that I have prefelt with dry felting and wound wool around it to keep it in place and then started the wet soaping felting process. I'm just experimenting at the moment to see what problems might come up. So far it has been difficult keeping the fibres from separating when shrinking and the prefelt has been helping with that. 

After the chair, I intend to felt a small coffee table that I found and a very sweet little foot stool with worn patches of tapestry that I intend to "restore" with needlefelting. Stay tuned. Any tips or suggestions welcome! 

Tuesday, 11 December 2012

A spot of dyeing

I confess, it's been a while since my last post. So much creating has happened, no less a little baby boy called Emrys being one of the most delightful of them. It's been a busy time with no time for blog posts, but this is something I hope to correct in 2013. Is it too early for resolutions. Christmas hasn't even passed yet.

Anyway, before the baby wakes here is a spot of dyeing that I did recently on a silk shirt that I chanced upon at the Melbourne Suitcase Rummage. I finally got those Silver Dollar Eucalyptus leaves to pay out their red orange tones and I love the result.


It's amazing what a few leaves, a handful of rusty nails, some string and a little water can do. I've run into two of my fellow Beautiful Silks India Flint workshop companions in the past month in Melbourne and on both occasions we have all by chance been wearing eco-dyed silk garments. Thank you India for your inspiration.

Monday, 16 July 2012

Sourdough Crumpets / Blueberry Hotcakes

These Sourdough crumpets or hotcakes have been a revelation in our house. They are absolutely divine. Forget pancakes these are so much better! So light and fluffy, yet crunchy and a perfect vehicle for butter and honey, or cheese, or blueberries and bacon and maple syrup New York style.


For anyone with a sourdough starter I can only say, you must try this! For people without starters, it is so worth starting one just to make these. I have a dedicated jar of sourdough starter just ready for making crumpets whenever we need them.

Step 1: Get your starter ready - take two tablespoons of your regular sourdough starter and place in a large jar with 1 cup of white spelt flour (or regular unbleached white flour), mix with warm water thoroughly to make a porridge like consistency and leave jar out covered with a cloth for a few hours to activate the mix before retiring to the fridge until you are ready to make crumpets the following day or whenever you get around to it. It doesn't matter how old your starter becomes, it will perk up when you add the bicarb just before making the crumpets.
Here is the recipe, adapted from King Arthur Flour

Sourdough Crumpets / Sourdough Blueberry Hotcakes
1 cup sourdough starter
1/2 tsp salt
1 tsp sugar
1/2 tsp bicarb soda in a little water
--
Pour out what starter you have from your jar in a mixing bowl (the remnants of your starter in the jar will be enough to get your next batch of starter ready for future crumpets - add 1 cup of flour to the jar with water and mix to a porridge like consistency and return the jar to the fridge with a cloth lid)
--
Add salt and sugar to the starter and mix well. 
--
Heat a good quality fry pan with a little butter and lightly grease your crumpet rings/egg rings or cookie cutter rings and place them on the pan to heat up. If you don't have rings, don't worry, just blob the mix on the pan without rings and they'll be more like hotcakes. 
--
Just before cooking, add the bicarb water mix and mix into the batter well. Put a dessertspoon full of mix into each ring, cook on a medium to low heat. You need to cook them until they dry out on top and the bubbles burst. Might take up to 10 minutes. Try to use the mix up in one cooking batch as the bicarb will wear off quickly unless you get the batter cooking. 
--
If you don't have enough rings while you wait for them to cook, just pour the rest of the batter into small fry pan and make one really big crumpet which you can cut into segments and toast. 
When the top has dried out, remove the rings, flip the crumpets and just cook for 1-2 mins on the bubbles side just to brown. 
Before serving, lightly toast the crumpets then lather on butter and honey, or stack them up pancakes style with fruit, yogurt and maple syrup.
--
Variation (as pictured) - Sourdough Blueberry Hotcakes: try adding a handful of frozen blueberries to the mix before cooking the crumpets or hotcakes and serving New York style a stack of them with crispy bacon and maple syrup. 

Enjoy!

Tuesday, 10 July 2012

Making Hand Dipped Beeswax Candles

Well, trying to anyway... I've always wanted to make my own hand dipped beeswax candles. Being due any day now I also envisaged birthing at home in the light beeswax candles that I'd made myself. A bit of a romantic notion and instead of lovely long tapered candles I ended up with three potted candles from beeswax that we collected from around some hives one weekend.

Around the hives at Heidi gallery in Heidelberg, Melbourne, we found some curious lumps of beeswax in the grass, some was really black. It smelt gorgeous and so we collected it up to see it we could make something of it.


I'd read that it was important to purify the wax before you melt it down to remove debris and other bits you might not want to burn and breathe. You do this by boiling the wax in a muslin bag so the wax floats to the surface and then repeating the process with finer mesh bags until your wax is lovely and clean. 

After it has boiled, you place the pot outside to cool and then you are left with a lovely solid disc of wax...
Break this up and put in a finer mesh bag and repeat the process, I used an old rolled oat sack...
When your wax is clean, break up and melt it in an old tin can...
Then you can begin the tedious process of dipping the wicks. I must admit this is where it all went horribly wrong. Because I had such a small tin can I could only dip the wick in a little bit. I ended up with candles that looked a little like this...
Hmmm. Decided these wouldn't really do so I ended up melting the wax and pouring it into little glasses with a wick in the centre instead. But not before knocking over the pot of hot wax and having to peel it off the kitchen and remelt and try again...


They actually burn beautifully so all was not lost and they smell lovely too...


Sunday, 1 July 2012

Extreme Darning and an Aussie Afternoon Tea

Yesterday at the markets, probably my last before baby arrives, I did a spot of extreme needle felt darning. A young gentleman had holes all through his favourite jumper and requested my darning services. The holes were enormous and required traditional woven darning before being reinforced with some spotty needle felting.

I say extreme because of a number of circumstances, namely the gale force winds, the cold, the rain, the time pressure and the large and numerous holes in the fabric. Not to mention my extremely pregnant state! Just two weeks to go!


Anyway, it was a bit of a challenge for my still new darning skills but I liked the results, definitely more interesting than before. I just hope the jumper remains a favourite of his! 

---

Today it has been raining all day and lately we've all had a bit of a taste for crumpets since it's winter so I decided to try the homemade variety. 


I didn't have the traditional circular crumpet rings so we ended up with crumpets in the shape of Australia, a koala and hearts. 


To go with this very Aussie afternoon tea we had Native Roasted Wattleseed Tea (delicious!) and lashings of butter and Aussie bush honey. All very comforting on a cold wet Melbourne afternoon. 


Tuesday, 26 June 2012

Knitting for Baby

I haven't been able to post as much as I'd like to because I just haven't been able to put down the knitting and sewing needles long enough. Our new baby is due in about three weeks and I've built up an adorable collection of baby knits that I've been dying to share with you all.

I'm especially in love with the patterns by Elizabeth Zimmerman who is just such a genius and writes patterns in such a casual way that you end up having to use your own nut and invariably learn a whole lot along the way. Great for relatively new knitters like me.

Can one baby have too many booties? In my quest to find the perfect bootie pattern I ended up trying five different patterns. My favourite is definitely the Elizabeth Zimmerman Bootees pattern from "The Opinionated Knitter"

Noro Yuzen yarn Wool/Silk/Mohair
Eki Riva Casual Baby Alpaca

 Second favourite knitted booties pattern is the Purl Soho Baby Moccasins pattern. I added little needle felted dots to them like I have been doing to everything of late...
Eki Riva Casual Baby Alpaca
 I found these two top down cardigan patterns a lot of fun to knit. The first is The Babykit for Melker by Pickles. I loved their colour choice and so did the same. It turned out to be the perfect size for a newborn and can't wait to dress the little dumpling in it!

Eki Riva Casual Baby Alpaca (my favourite yarn for babes)

I made little fabric covered buttons to match
Second cardigan is the Baby Sweater on Two Needles by Elizabeth Zimmerman in her brilliant Knitters Almanac. It has a little ceramic button that my partner made so it has a bit of him in it too which is nice.


What baby can be without a beautifully soft baby alpaca bonnet? This was such a fun pattern and quite ingenious too I thought. It's the Purl Soho Baby Bonnet. So adorable and so lovely and soft in  Eki Riva Baby Alpaca (again!)


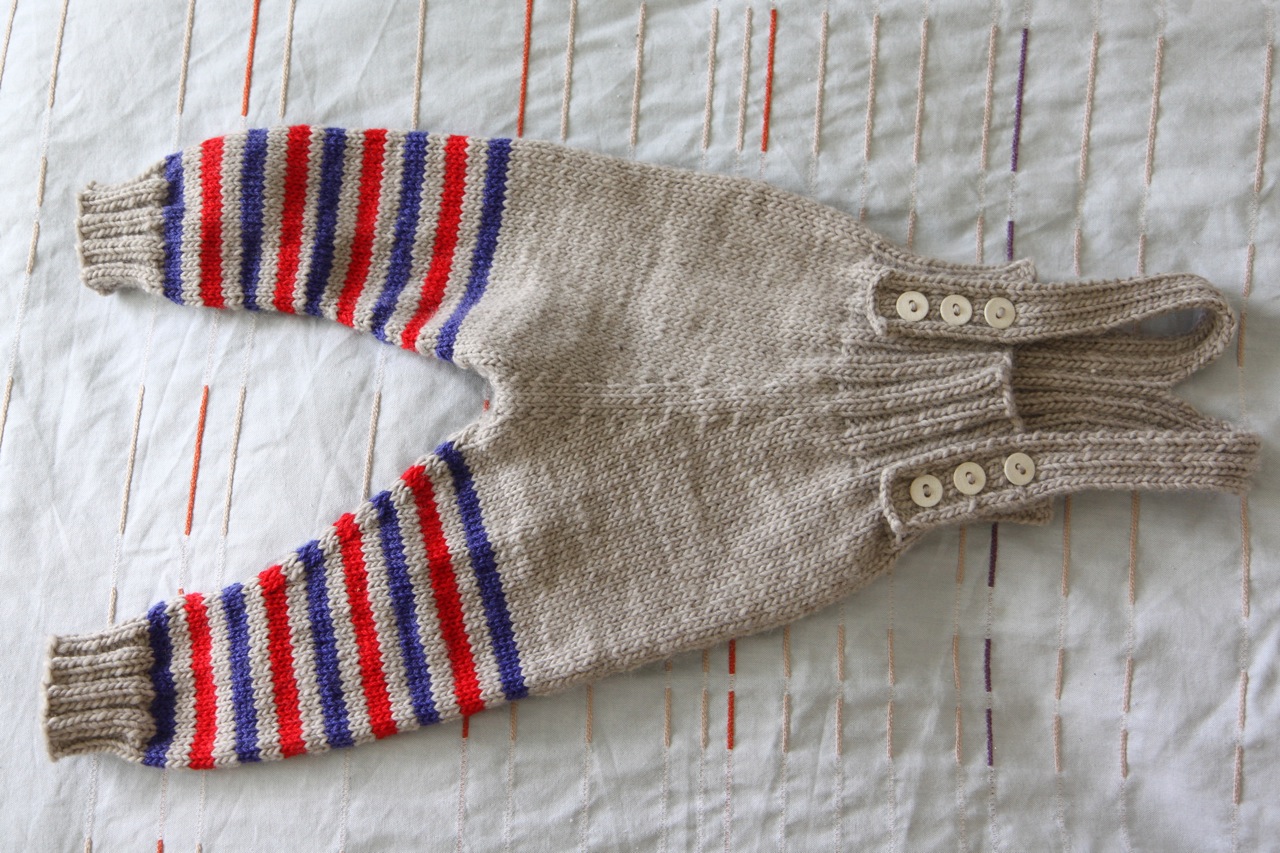
 I'm quite proud of this little wool playsuit which is my take on the Elizabeth Zimmerman Baby Leggings pattern again from the Knitter's Almanac.


I found the rise in the crotch way too long even from a fully cloth nappied baby bottom so I cut through my knitting, salvaged the yarn and added the stitches back on the needle to continue knitting upwards. I added a long rib top and continued up the back, splitting the stitches into two straps that have three button adjustments so hopefully these will last baby a couple of seasons.


Well thank you for indulging me and my baby knit obsession. I can put it down to a combination of hormones, nesting instinct and a little bit of anxiety that I may not be able to pick up the needles as much as I may want to in the first few weeks/months of baby II's arrival. With three weeks to go, I may even add to the collection, I'll keep you posted.


Related Posts Plugin for WordPress, Blogger...