Please enable javascript, or click here to visit my ecommerce web site powered by Shopify. Cobbled Together by Brenna -->

Pages

Wednesday, 23 February 2011

Regret

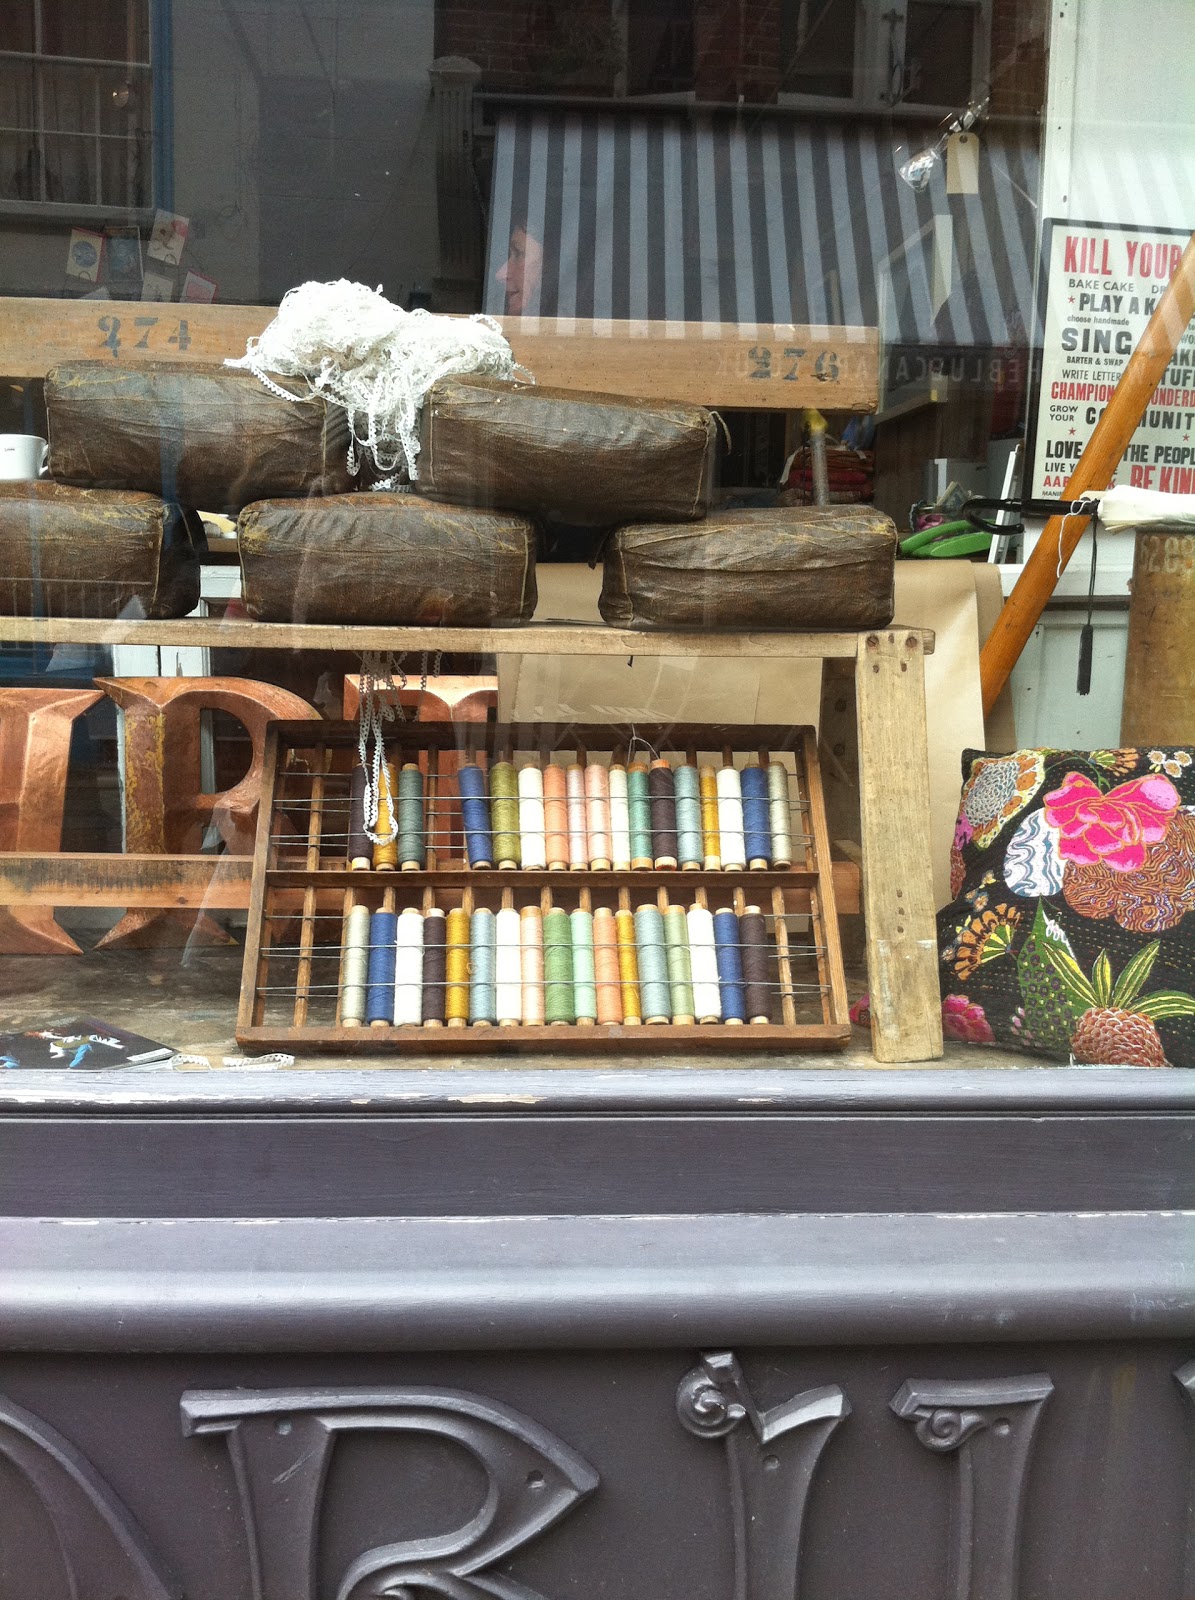
I'm still mourning not purchasing these beautiful antique silk threads that I discovered at an emporium of delights in the surprisingly fascinating Hastings old town.

On a stroll through the town at night I discovered these threads shimmering in the dark shop window. The shop keeper had cleverly hidden the price so we had to make a special trip the next day just to find out that they were disappointingly out of my price range, if such a thing could be said of such a priceless object! But try convincing a man of this! Yes, they are over £50 but they are also under £70! And I've just done the maths and worked out that they are less than 2 pounds per silk bobbin. What have I done?!

These threads in the most pleasing arrangement of colours come in a beautiful customised bee hive frame, you know, the frame the bees construct their honey comb on. The original owner has made an ingenious thread dispensing device out of an old bee frame. Oh how I would love to embroider with these threads...

Wednesday, 2 February 2011

Free Toddler Backpack Sewing Pattern


Free Toddler Backpack Sewing Pattern Tutorial

This is a great project for using up lovely off cuts of upholstery fabrics or samples that you can often find at the local charity shop, carboot sale or fabric seconds warehouse. The upholstery fabric is tough and gives the backpack a sturdy vintage feel. It’s also super unique and a bag your toddler will be proud to wear. It’s practical too, with a button on shoulder strap connector that can be taken right off if it is not required. It’s handy for longer walks as most straps start falling off the shoulders of little ones.

The finished size of the backpack is 12” x 8.5” x 3.5”, it’s a perfect size for a walking 18month old - 4/5 year old.
If you'd like to just buy one of my ones and skip the making it yourself bit, click here!

Materials
1 x half yard of upholstery fabric or thick cotton twill (outer)
1 x half yard of cotton fabric (lining)
or I recommend using off cuts or samples of upholstery fabrics, the largest pieces needed will be 12.5” x 9”, I like using different coordinating patterns for each side of the backpack. You’ll also need a couple of long strips of fabric for the straps about 21.5” x 3.5” long.
Two small buttons
One large main button
One cord tie approx 25” long – you can crochet or knit an i-cord or use a knitting nancy to create a cord. Alternatively just buy a coordinating piece of cord that will go with your fabrics.

Equipment
Sewing machine, Iron, Fabric scissors/Pinking Shears (optional), Needle and thread

Instructions – see diagrams for more info
Seam allowance throughout ¼” unless otherwise specified

1.     Cut out all pieces as shown in the diagram below...


2.    Pin flap pieces (a) right sides together (RST), sew up leaving one long side open. Clip corners, turn out and press flat.
a.    Mark where you want your button hole as per diagram and ensure the size of your buttonhole is slightly larger than the diameter of your main button
b.    Sew buttonhole, clip open and put to one side

3.    Upholstery fabric/outer fabric
a.    Pin pieces B1, C1, B2, C2 RST (right sides together) along their long sides.
b.    Sew along each long side remembering to stop ½” before the end of each side. (this leaves room in the seam to sew in the base of the bag more easily)
c.    Press seams flat
d.    Pin base into place RST
e.    Sew around base easing gently around the corners to avoid puckering
f.     Press seams and turn out

4.    Repeat Step 3 for lining fabric, the only difference being that you need to leave a gap in one of the side seams of the lining fabric of 3 inches. This will be the hole that you will turn the piece through. Do not turn the lining fabric out, leave it with the wrong side facing out.

5.    Take the flap piece that you made in Step 2 and pin this RST with back side of the outer bag shell.
6.    Place the outer bag shell with the attached flap, inside the lining shell. The right sides of the outer and lining fabric should be together. Pin along the top of the bag and sew around all four sides.

7.    Turn bag through hole in lining fabric. Sew up the hole to close and press seams. Sew a top stitch line around the top of the bag ¼” from the top edge

8.    Mark buttonholes for the cord tie to go through as per the 1st diagram. There should be four buttonholes evenly spaced on the front and the back of the bag and one buttonhole in the middle of each side of the bag. The top of each buttonhole should start 1.5” from the top edge of the bag. Sew buttonholes and clip open.


9.    Straps (make 2)
a.    Fold strap pieces lengthwise and pin
b.    Sew down with a seam allowance of ½”
c.    Turn through and adjust so that the seam of the strap is centred on one side
d.    Insert 3 inch piece of elastic 8” in from the end, pin and sew across to fasten. You can pin a safety pin to the end of the elastic to make it easier to take hold of it and stretch it through.
e.   Take hold of the free end of the elastic inside the tube and pull tightly and pin 2” from the end of the tube, sew across to fasten. The fabric should gather in this section only.
f.    Turn the rough ends of the tube in about ¼” and sew closed. Sew a top stitch line ¼” in from the edge along each side of the strap, don’t stitch over the elasticised section.


10. Secure straps to bag
a.   Pin straps on to back of the back at points indicated on 1st diagram. The top of the straps should sit above the buttonholes and in line with the top of the bag, but about 1” in from each side of the bag
b.   The bottom of the straps should sit ½” from the sides of the bag and about 1” from the bottom of the bag.
c.   Sew up as indicated in the diagram above.

11. Make strap harness piece
a.    Fold piece lengthwise RST and pin
b.    Sew ½” seam allowance
c.    Leaving wrong side out, adjust so that seam runs down the centre of the piece and sew a point on one end as shown in diagram below
d.    Clip and turn out, press flat
e.    Turn rough end in ½” and sew closed
f.      Sew a topstitch line ¼” in from edge around all sides of the piece
g.    Mark buttonholes slightly larger than the two smaller buttons one hole on each end of the piece approx ½” from each end.
h.    Sew buttonholes and clip to open
12. Finishing
a.    Sew on main button to correspond to placement of buttonhole on flap
b.    Thread cord through the buttonholes and tie


So there you have it, one lovely handmade extra special backpack for your little one. If you use this pattern, please write a comment below and let me know how it was for you. I am writing up more cute patterns for both children and adults and would love the feedback, being new to all this pattern tutorial writing. If you have any queries, please leave a comment and I'll try to respond as soon as possible.

©Brenna Jensen | This free pattern is for private use only and not for commercial gain, for further information please contact me.

In the meantime, have a look at my Etsy shop for more of my handmade goodies.


Wednesday, 26 January 2011

The long awaited cycling cap

One of my many new years resolutions was to finished this long awaited saga of a knitted cycling cap that was a March birthday present for Andrew. The first couple of attempts didn't quite cut the mustard, the first being too small, perfectly fitting my one year old, the next not quite right either, that one went to my partner. But finally this month I stitched sealed and delivered the cap and can now hopefully get on to the rest of my unfinished knitting projects gathering dust and losing their relevance in the bottom of a basket. I have my fingers crossed for more snow because there is a very warm Norwegian brioche doubled sided alpaca scarf that was supposed to be a Christmas gift for my partner.


The pattern for this brilliant hat is designed by Tony Limuaco aka The Yarn Monkey, and can be found on Ravelry. It's a really interesting knitted construction and such a joy to knit something so clever. Over summer it was the only hat my toddler would wear, I think it was because he had so many compliments about it! I reckon I'd be very wealthy indeed if a) I had designed this pattern and b) could hand knit it on an industrial scale!

Wednesday, 15 December 2010

Additions to the Owl Scout Family

My owls were very popular at the Christmas fairs and I'm pleased that there will be lots of fluffy woollen owls under Christmas trees this year. Here are a few more made out of a refashioned icelandic woolen sweater. Alas the green baby owls have already gone but the others are soon available on Etsy and Folksy...

Friday, 3 December 2010

More papoose babies

Just packed up all my babies ready for this weekend's Advent Craft Fair. Here are some more Papoose babies,  I just love them all huddled together like this.


Monday, 29 November 2010

Blue Birds Hanging Wall Garland

Here are some photos of some new pieces I have just made for the craft fairs. I'm especially enamoured of my blue birds, made from recycled wool and cashmere felt, they are available on etsy now...


Tuesday, 23 November 2010

Papoose Baby Dolls


I'm making a series of Papoose baby dolls. I was inspired by a film I saw recently called Babies (2010). It's basically a documentary following the births and babyhood of four children, one born in San Francisco, one in Tokyo, another in Namibia and the last in Mongolia. It's really fascinating. It very much illustrates to me how much we, in the west, are having fewer and fewer "real" daily experiences. There is a scene which cuts between a baby in San Francisco, playing indoors with plastic toys and a baby in Namibia exploring the banks of a creek with his sibling which I found particularly moving.

For a baby, those "real" experiences of the world are so important for development. By "real" experience I mean sensory experiences of the natural world. That's why I believe that the baby should be clothed in  natural fibres and surrounded by things made from natural materials as much as possible. Maria Montessori wrote in her book 'The Absorbant Mind', "The child has a different relation to his environment from ours. Adults admire their environment, they can remember it and think about it; but the child absorbs it. The things he sees are not just remembered; they form part of his soul. He incarnates in himself all the world about him that his eyes see and his ears hear...the child is transformed by them."

But I digress! Back to the dolls...In the film when the Mongolian baby is born, he is swaddled tightly in a blanket that is tied up with a number of ribbons.


The next scene shows her swinging her leg over a motorbike and riding back to the yurt on what must have been the bumpiest of terrains, ouch! It was quite impressive yet also slightly unnerving. 


The image of the swaddled baby has stayed with me.  I have collected a few colourful, ethnic woollen garments that I have boiled up and felted and turned into these little Papoose Baby Dolls. I think they are quite adorable. I'm selling them at the St Paul's Advent Fair and on Etsy/Folksy if anyone is interested. 


More pictures of the other dolls coming soon....

Monday, 22 November 2010

Nesting Elephant Puzzle

I just love the Made By Joel blog, he's a dad who makes lovely simple toys for his kids on an almost daily basis! Lucky lucky children. Anyway, I was inspired to make one of his Elephant Puzzles for Merlin. I wanted to try my hand at a bit of woodwork. I had memories of doing this kind of thing at Montessori school, drawing a design and cutting it out by hand with a children's coping saw. I remembered it being quite easy so I was surprised to find that actually cutting through an inch thick beech Ikea chopping board was not the gentle carving motion I had in mind, but actually a sweaty, curse inducing labour of love. Anyway, with cutting over, I sanded it well, and gave it a couple of coats of Danish tung oil (which is a beautiful natural wood oil), and I was quite pleased with my efforts. Oh, and so was Merlin for whom I was actually making it, umm I think, or was I making it for myself? I get muddled sometimes.


Monday, 15 November 2010

Advent Fair East London 3-4 Dec 2010

Put the date in your diary and come along for a great Christmas shopping experience. I'll be selling my felt fruit, woollen owls, papoose dolls, crochet bunting, woollen Christmas decorations and more!


Thursday, 11 November 2010

owl scout family

I've two more Owls finished. Each time Merlin wakes from his midday nap, the owls have multiplied. I'm thrilled that he is so smitten with his owl buddy. I can't wait to make more, I think I'm going to make a whole Forest Critters Scout Series, including red robins, foxes, squirrels, deer, owls, badgers... we'll see how far I get before the next project consumes me! But for now, it's all about owls.

If you fancy one of the new owls, I have just listed them on my Etsy store, take a look.


Monday, 8 November 2010

owl scout

I'm making a series of owl scouts out of recycled felted woollen sweaters. Merlin loves owls and I was inspired by a felted kids jumper i found at a carboot sale which had all these cute scout badges on it from 1981 so they are nearly, what, 30 years old, wow so they are vintage now I suppose. I think owls make the perfect scouts.

I'll be putting the other owls up for sale on etsy as I make them so watch this space!

Sunday, 31 October 2010

Forest Floor


On a stroll through Epping Forest last weekend...

Tuesday, 26 October 2010

Autumn Leaves

busy Merlin in the woods

Autumn is an incredibly exciting time in London, it feels as if everyone is busy creating. This must be some lingering instinct from bygone days when Autumn was an industrious time of harvesting, pickling and preparing for a long sparse winter. Well, whatever it is, I like it. I've always liked Autumn, but now that I'm a knitter, Autumn signals an excuse to get those pins out and produce layers of woolly warmth for loved ones.


As a tribute to Autumn, I made this pretty mobile out of waxed tissue paper, that celebrates the leaves changing from green to brown.

Here's how you can make your own Autumn Leaves paper mobile:
  • Trace a leaf - I found the typical leaf shape more effective than a maple style leaf...
  • Cut out shape in layers of tissue paper in colours from greens through yellows, oranges, reds and browns (about 5 layers in each leaf)
  • Place half a pipe cleaner in the middle of each stack of 5 paper leaves and stitch a holding stitch either end of the pipe cleaner with a loop between. Then attached the hanging thread in the middle of the loop so that the leaf balances straight. You can then fold up and down some of the layers of the leaf to reveal the various colours
  • Make a ring out of some wicker or a pliable vine, or use some wire and cover with fabric strips or ribbon. Add four ties to the ring and tie with a loop for hanging, make sure it balances well
  • Hang the leaves in stages so that they spiral down (I've used eight leaves because it worked well with the four ties)
Hang and enjoy. Light a candle underneath (not too close) and watch the leaves twist and turn.

Thursday, 14 October 2010

dinosaur eggs or latex bowls

Recently at 100% Design London 2010, I saw a great project called Ten-Plan where 10 designers had created 10 environmentally sustainable designs and generously allowed access to the plans for free. These bowls were one of my favourites they are by a very interesting designer Gitta Gschwendtner. Visit Ten-Plan to download the plans to make a set of bowls for yourself. They are made from natural latex, latex baloons, pigment and sawdust, that's it - so they are completely biodegradable.


Tips I'd give for a successful project would be to ensure that the latex/sawdust mix is laid on thick enough to hold the structure of the bowl (i spread it on with a knife quite thick, however you could also do a couple of layers to really hold the shape).


I find them just so exotic and beautiful, I just can't stop admiring them. They remind me of dinosaur eggs or like the thunder eggs we used to go digging for when I was a child.
enjoy.


Related Posts Plugin for WordPress, Blogger...